Marine Cargo Template – Implementation and User Guide
The Marine Cargo template is meant as a starting point for an individual implementation including several already-configured features and a workflow with typical cargo-related features and functionalities.
The default structure of the workflow is built into the OCMNMarineCargo workflow container. For details on the default components of the containers, see the Marine Cargo Workflow Components section.
Template Functionality
The Marine Cargo template includes the following functionality:
- End-to-end workflow experience for Marine Cargo products.
- Underwriting management tools via a suite of Common Template containers.
- Flexible rating template for Cargo, Storage, and War coverages.
- Included integration on-bind to Insurity’s Oceanwide Marine Suite for shipments, storage declarations, and certificate generation.
Requirements
The following components are required in order to follow the implementation steps outlined later on:
Minimum Bridge build: 128
The following Bridge Workflow Accelerators (Implementation not required):
General (XBWFGeneralContainer)
Custom Client (CustomClient)
Additional Interests (ADINAdditionalInterests)
Clearance (CLRCClearanceContainer)
Compliance (CMPLComplianceContainer)
Eligibility (ELGBEligibilityContainer)
Insurance History (INHIInsuranceHistoryContainer)
Loss History (LOSSHistoryContainer)
Quote Versioning (QTVSQuoteVersioning)
Reinsurance (REINReinsuranceContainer)
Schedule of Forms (SOFScheduleofFormsContainer)
Subjectivities (SUBJSubjectivities)
Referrals (XLR8RReferral)
Note: If your environment does not include any of these Common Template containers, they can be imported from export files. For instructions on importing the files, see Importing the Workflow Containers user guide.
Using the Marine Cargo Workflow
Policy and Insured Details
This screen is used to enter in Client details, select a policy type, coverage type, and quote type.
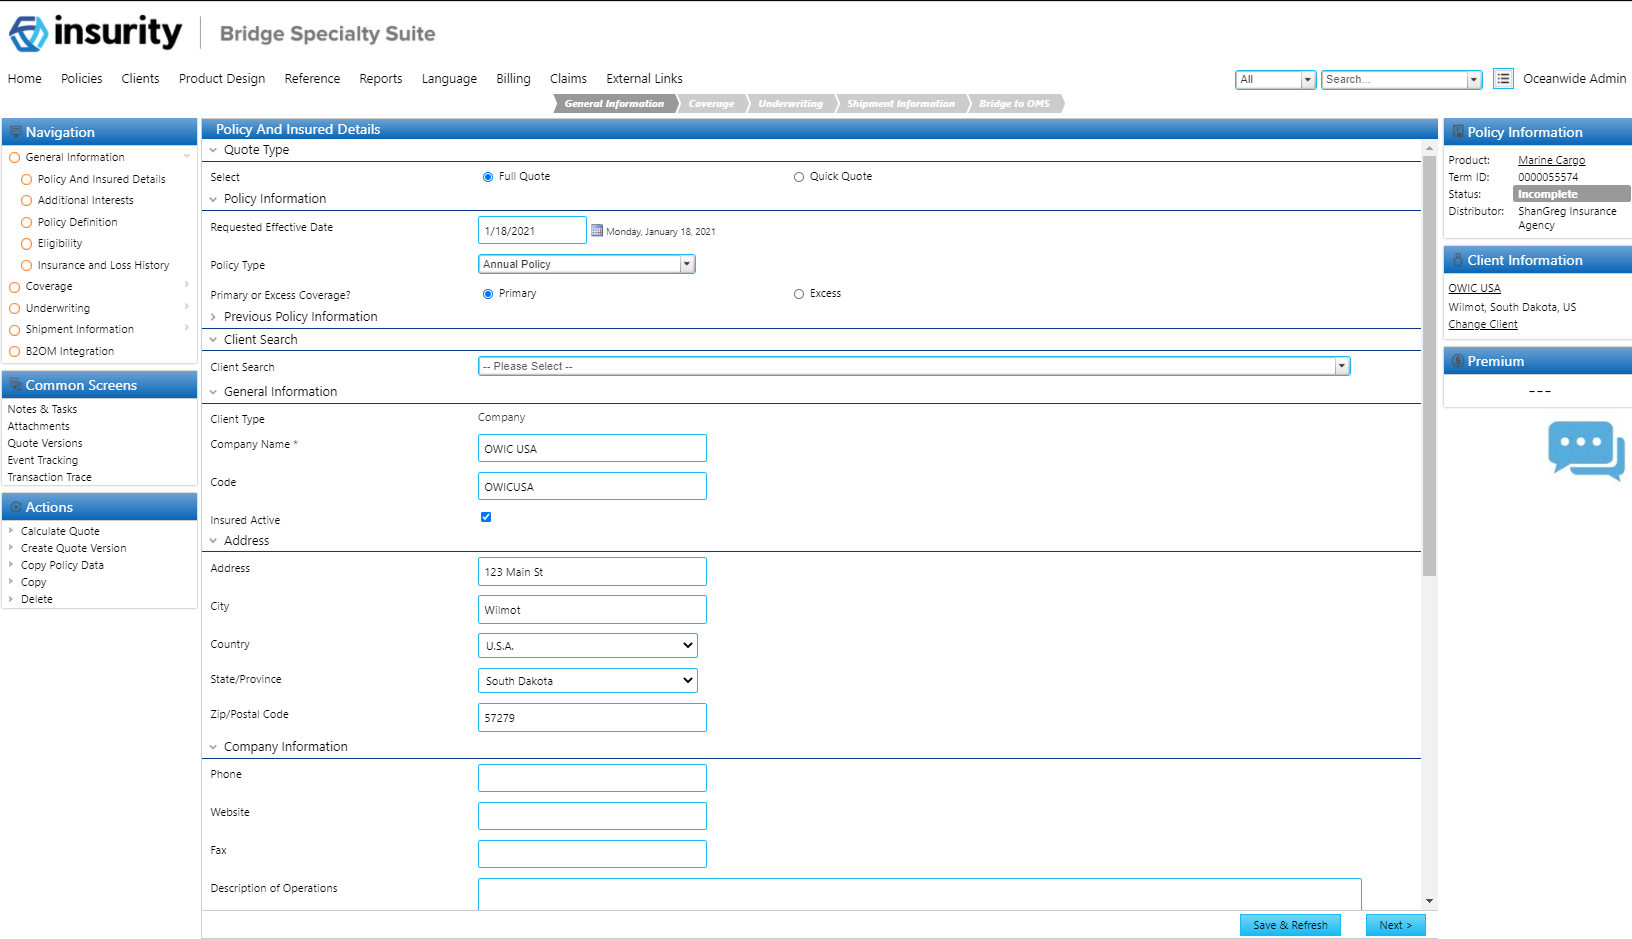
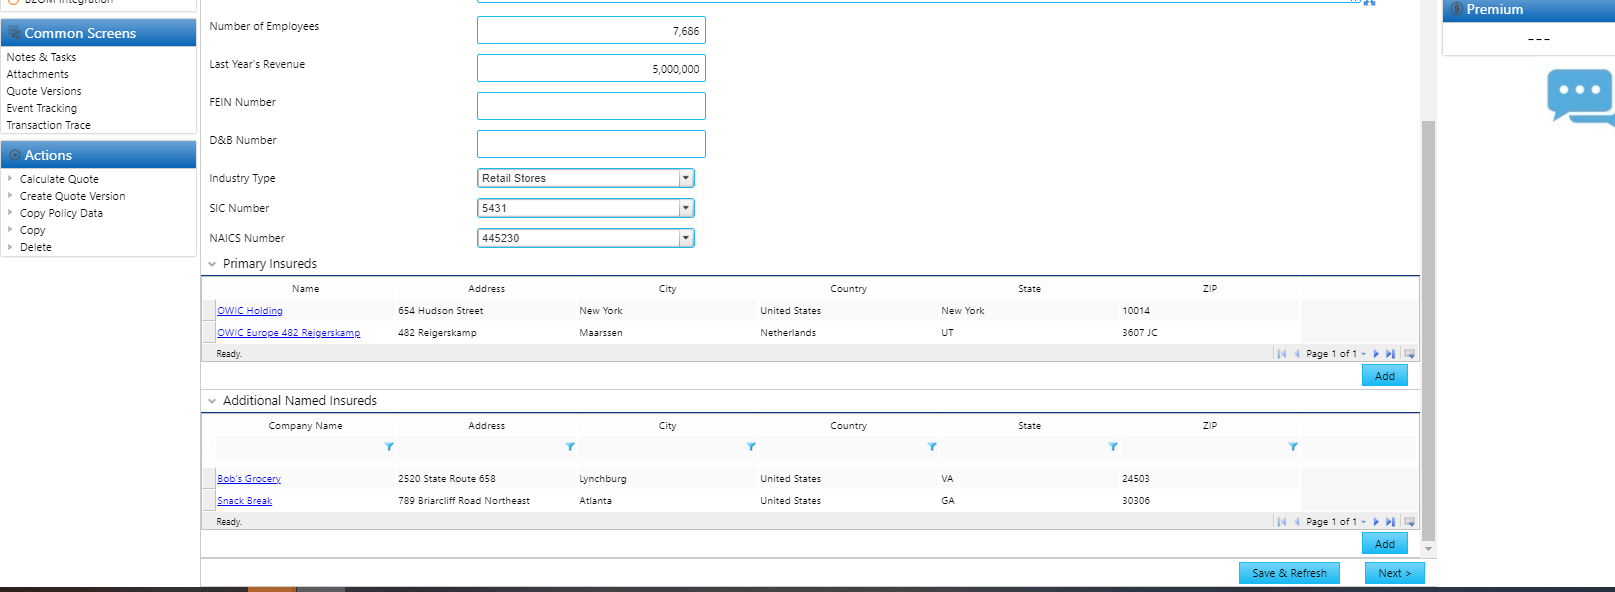
Select Full Quote or Quick Quote. The system defaults to Full Quote.
Note: Quick Quote is not available out of the box and will need to be added with custom configuration.
Select a requested policy date.
Select a policy type. Out of the Box, Annual Policy and Open and Continuous are available for selection. Special Projects will be rolled out in phase 2.
Select whether the policy coverage is primary or excess. The policy will default to primary.
Select an existing client from the Client Search or enter in information about a new client. Any changes to details about an existing client will be saved to the client record.
Add any additional primary insureds to the Primary Insureds grid, and named insureds to the Named Insureds grid.
Additional Interests
This screen is included in the Marine Cargo template out of the box, and is part of the Bridge Workflow Accelerators. For more information on how to use this solution, see the Additional Interests User Guide. Remove this screen from the workflow if additional interests are not required.
Policy Definition
This screen will drive screen and panel behaviours throughout the workflow. Answering Yes to the following questions will drive the behaviours described:
Are assureds reporting shipments activity? Exposes Cargo Details screen, where route, conveyance and commodity information can be entered. Will select Cargo as a coverage on the coverage selection screen?
Will assureds be generating certificates of insurance? Exposes Certificate Templates screen, where certificate templates can be attached to the policy?
Note: Certificate Templates can only be printed once the policy is integrated to OMS.
Are assureds reporting periodic shipment declarations? Exposes fields on the Cargo Details screen related to shipment declarations?
Is storage incidental to transit applicable? Exposes Storage Details screen, where named and unnamed locations can be added. Will select Storage as a coverage on the coverage selection screen?
Are specific primary assureds/named assureds subject to special rates and/or conditions? Exposes the Special Rates grid on the Policy Rates screen?
- Are assureds reporting storage declarations? Exposes fields on the Storage details screen related to storage declarations?
- Are war policy details captured (policy number, rates, conditions)? Exposes the War Details screen. Will select War as a coverage on the coverage selection screen?
Eligibility
This screen is included in the Marine Cargo template out of the box and is part of the Bridge Workflow Accelerators. For more information on how to use this solution, see the Eligibility User Guide. Remove this screen from the workflow if Eligibility is not required.
Insurance and Loss History
This screen is included in the Marine Cargo template out of the box and is part of the Bridge Workflow Accelerators. For more information on how to use this solution, see the Insurance History User Guide, and the Loss History User Guide. Remove this screen from the workflow if insurance or loss history is not required.
Coverage Selection
This screen is where coverages can be selected, and details added such as limits and deductibles.
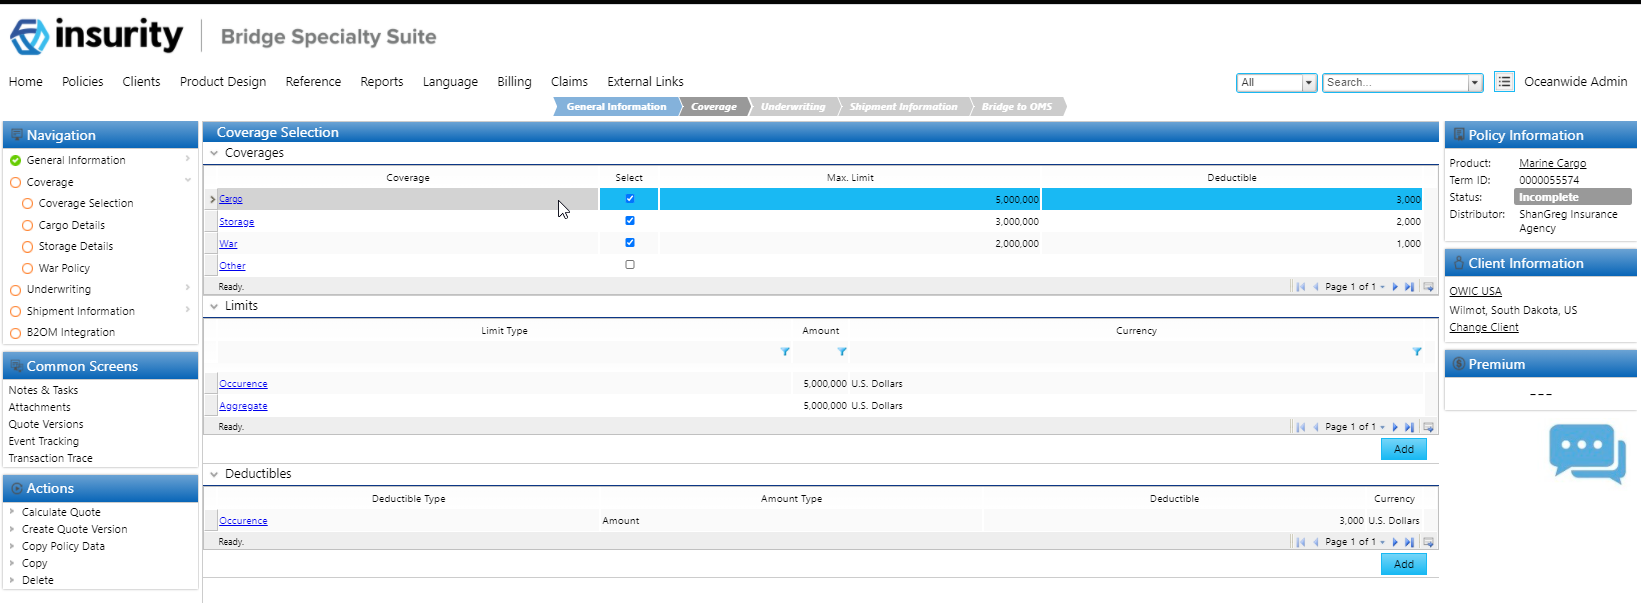
Coverages will be selected based off of the questions answered on the Policy Definition screen. Additional coverages can be selected by checking off of Select column.
Add maximum limits and deductibles in the Coverages grid.
Each coverage exposes two child grids where additional limits and deductibles can be added.
Cargo Details
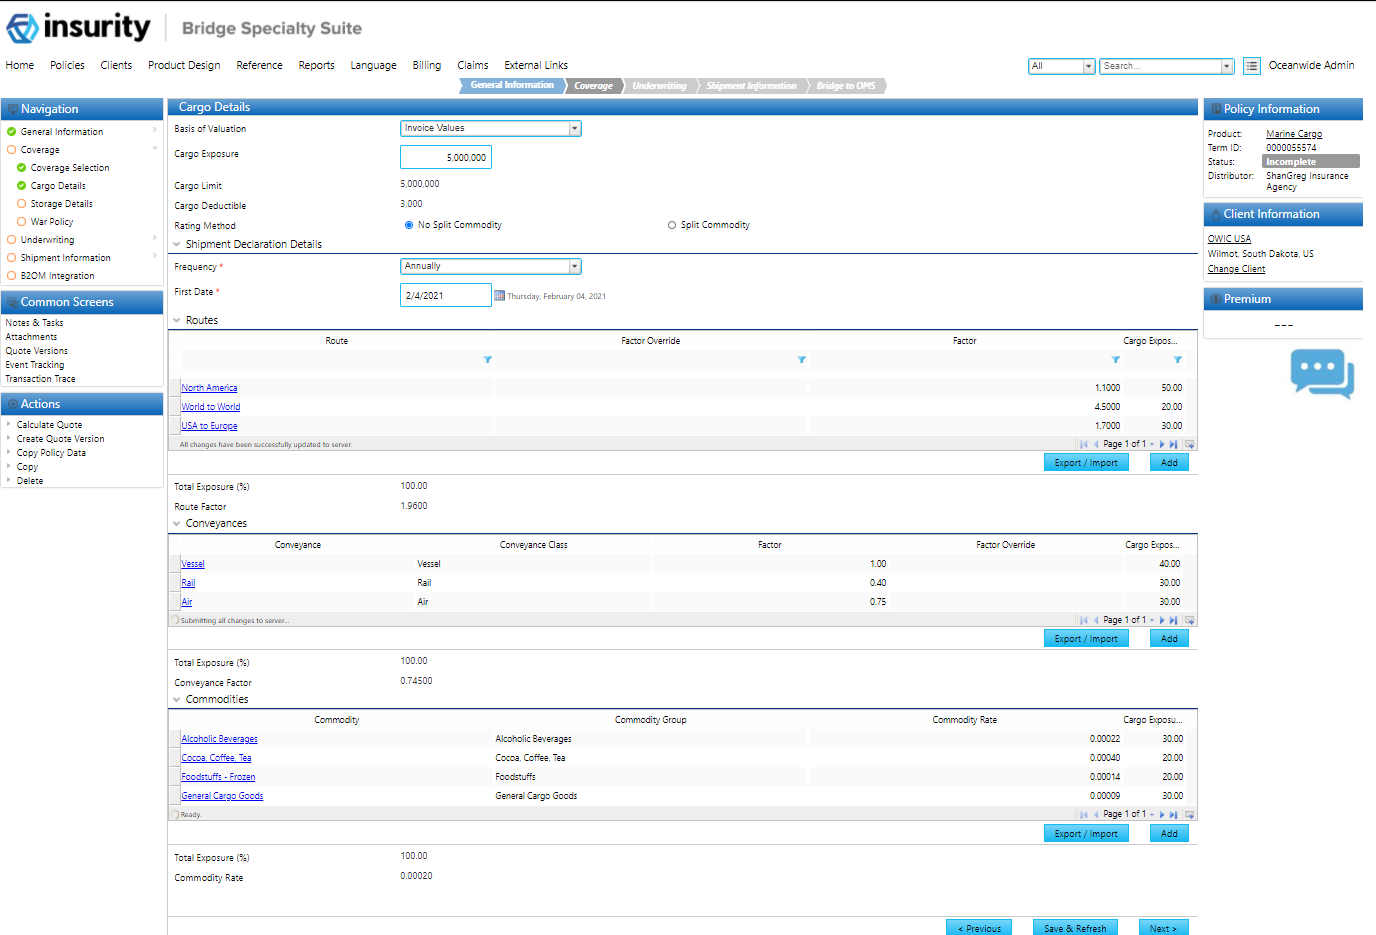
Select a Basis of Valuation.
Enter in the Cargo Exposure.
The Cargo Limit and Deductible fields are automatically populated from the Coverages screen.
(Only available if answered Yes to shipment declarations on the Policy Definition screen) Enter the frequency and first date of shipment declarations.
Select a Rating Method.
No Split Commodity: This is the simpler and less granular cargo rating method to use. It will take the overall route factor, overall conveyance factor, and overall commodity rate and multiply them together to get the overall cargo rate.
.∑ (Route Factor × Route Exposure) ×
.∑ (Conveyance Factor × Conveyance Exposure) ×
.∑ (Commodity Rate × Commodity Exposure)
Split Commodity: This method is more granular and will breakdown the routes/conveyances at the commodity level.
.∑ (Commodity Rate × Commodity Exposure) ×
.∑ (Conveyance Factor × Conveyance Exposure) ×
.∑ (Route Factor × Route Exposure)
Add all Routes applicable to the policy. This can be done by attaching them manually to the grid or uploading a spreadsheet.
Storage Details
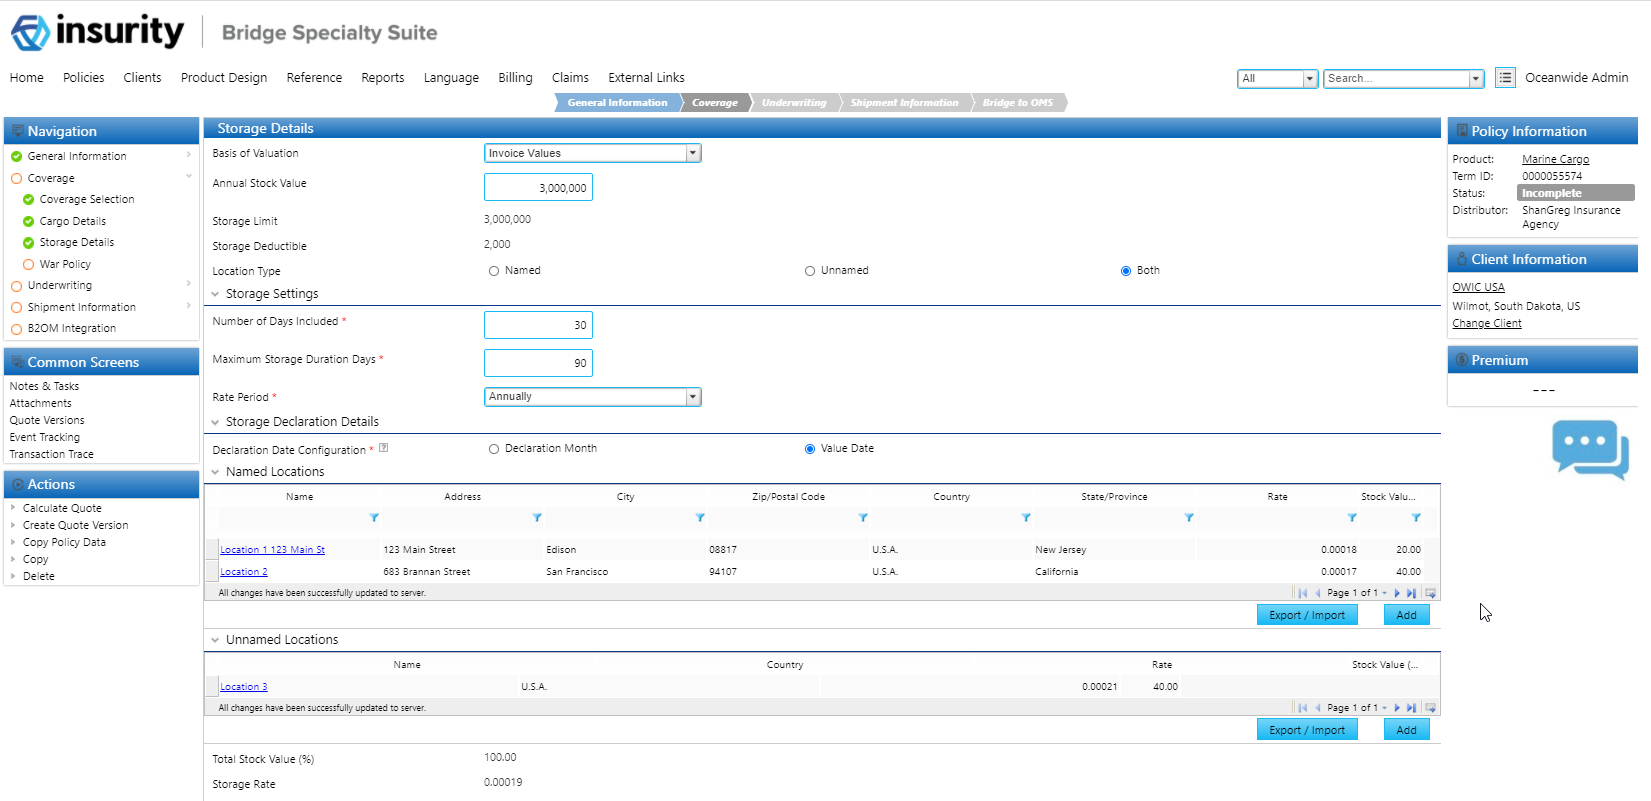
- Select a Basis of Valuation.
- Enter an Annual Stock Value.
- The Storage Limit and Deductible fields are automatically populated from the Coverages screen.
- Select the Location Type to expose the Named Locations grid, Unnamed Locations grid, or both.
Enter the number of days included, max. storage duration days, and the rate period.
Note: Only available if answered Yes to storage declarations on the Policy Definition screen.
- Select the declaration date configuration.
Enter in location details in the Named Locations and Unnamed Locations grids.
Note: The total stock value of both grids must add up to 100%.
War Policy
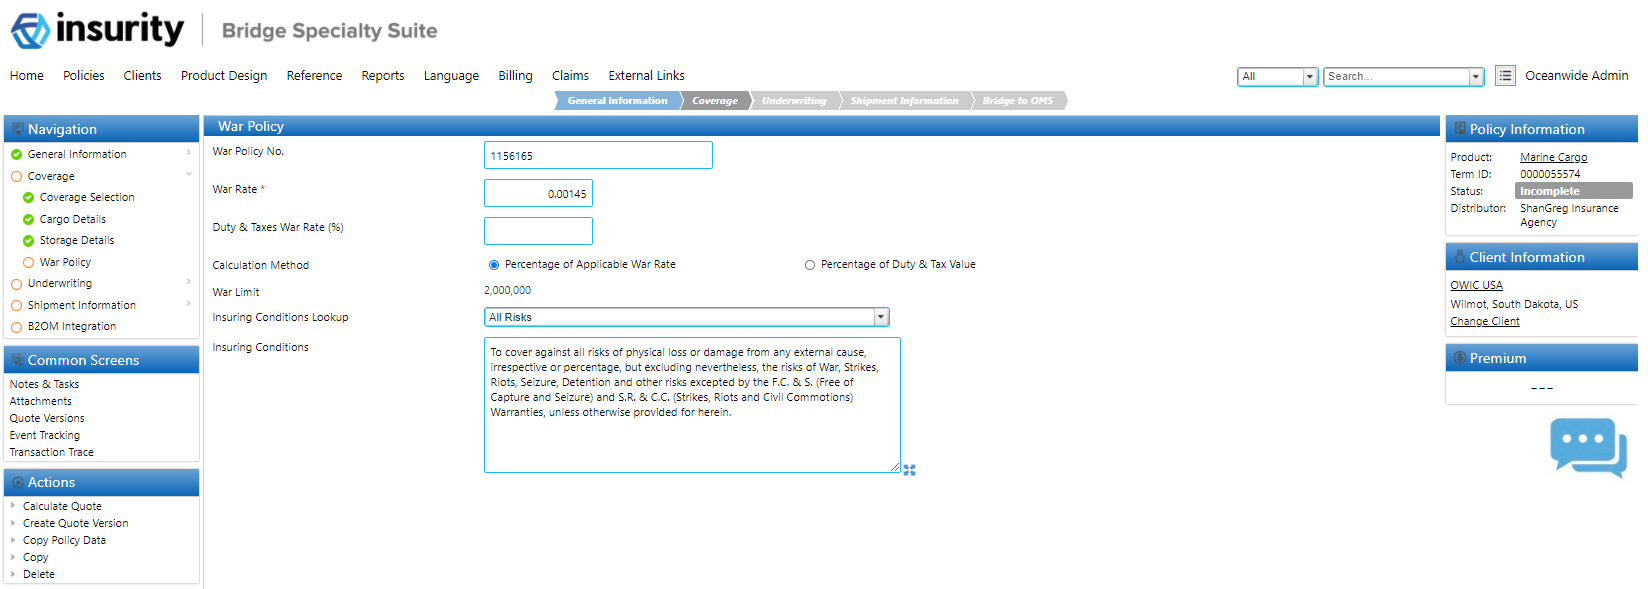
- Enter in the policy number of the war policy (if applicable).
- Enter in the war rate.
- Enter a Duty and Taxes War Rate (%) (if applicable).
- Select a calculation method.
- Enter in or search for any applicable insuring conditions.
Quote Information
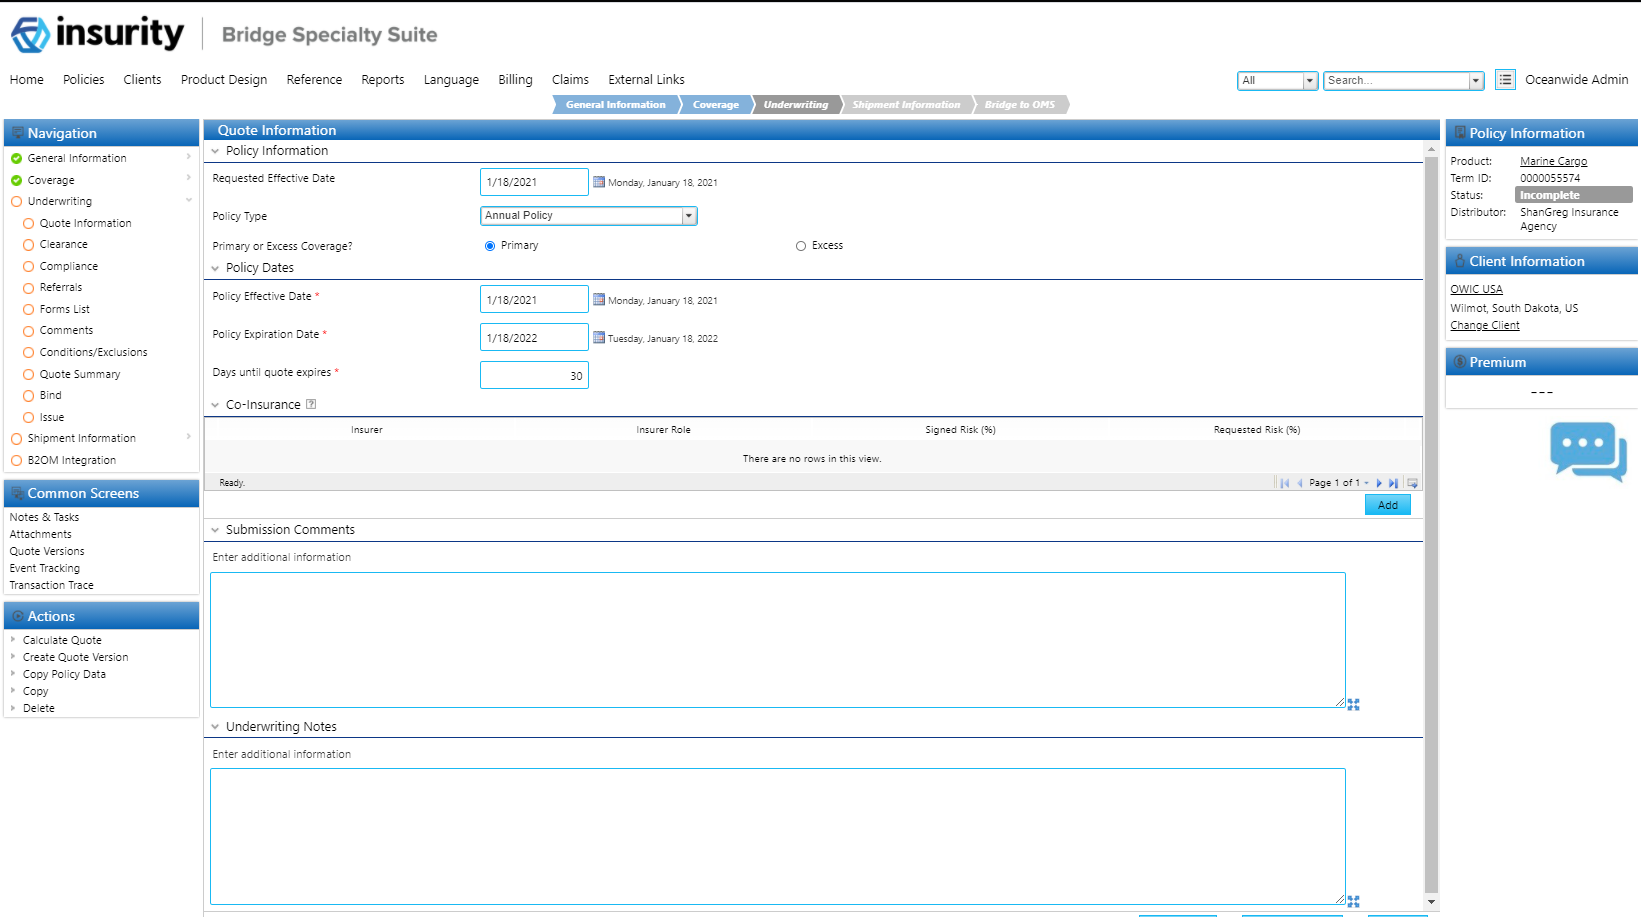
Most of the information on this screen is pulled from other fields in the workflow.
Add any co-insurers to the Co-insurance Grid.
Underwriting – Clearance, Compliance, Referrals, Forms List
This screen is included in the Marine Cargo template out of the box and is part of the Bridge Workflow Accelerators. For more information on how to use this solution, see the:
Clearance User Guide
Compliance User Guide
Referrals User Guide
Schedule of Forms User Guide
Remove any of these screens if these solutions are not needed.
Conditions/Exclusions
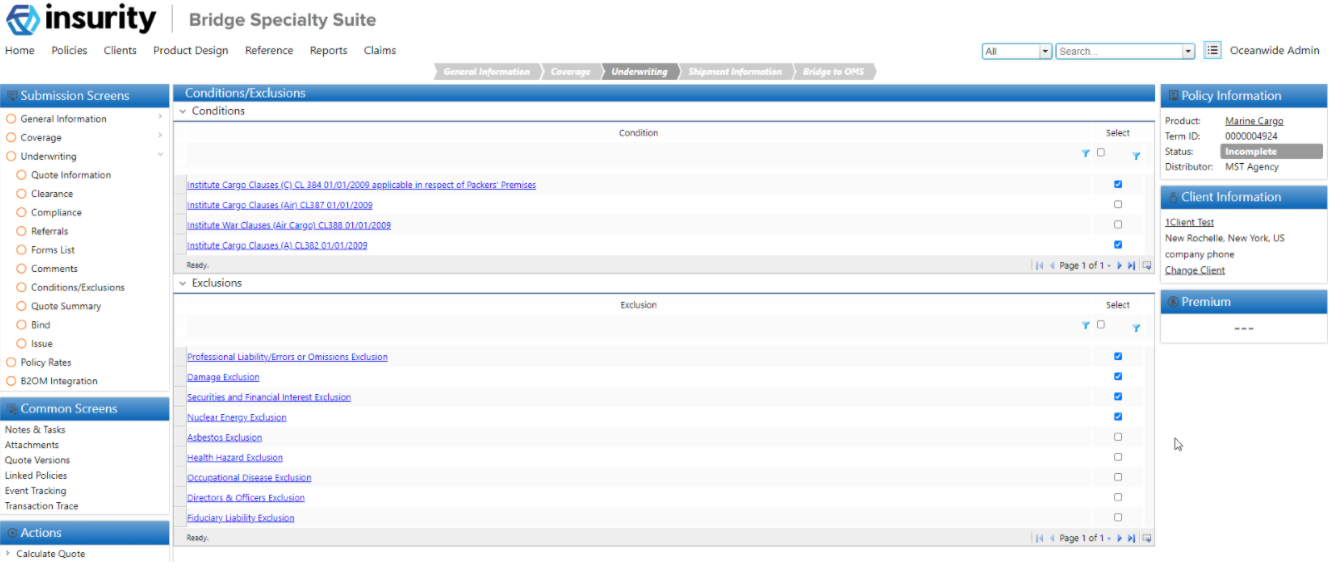
Select or de-select Conditions from the Conditions grid and Exclusions from the Exclusions grid.
Quote Summary
Upon quoting the policy, all premiums, limits and deductibles are saved and can be viewed here.
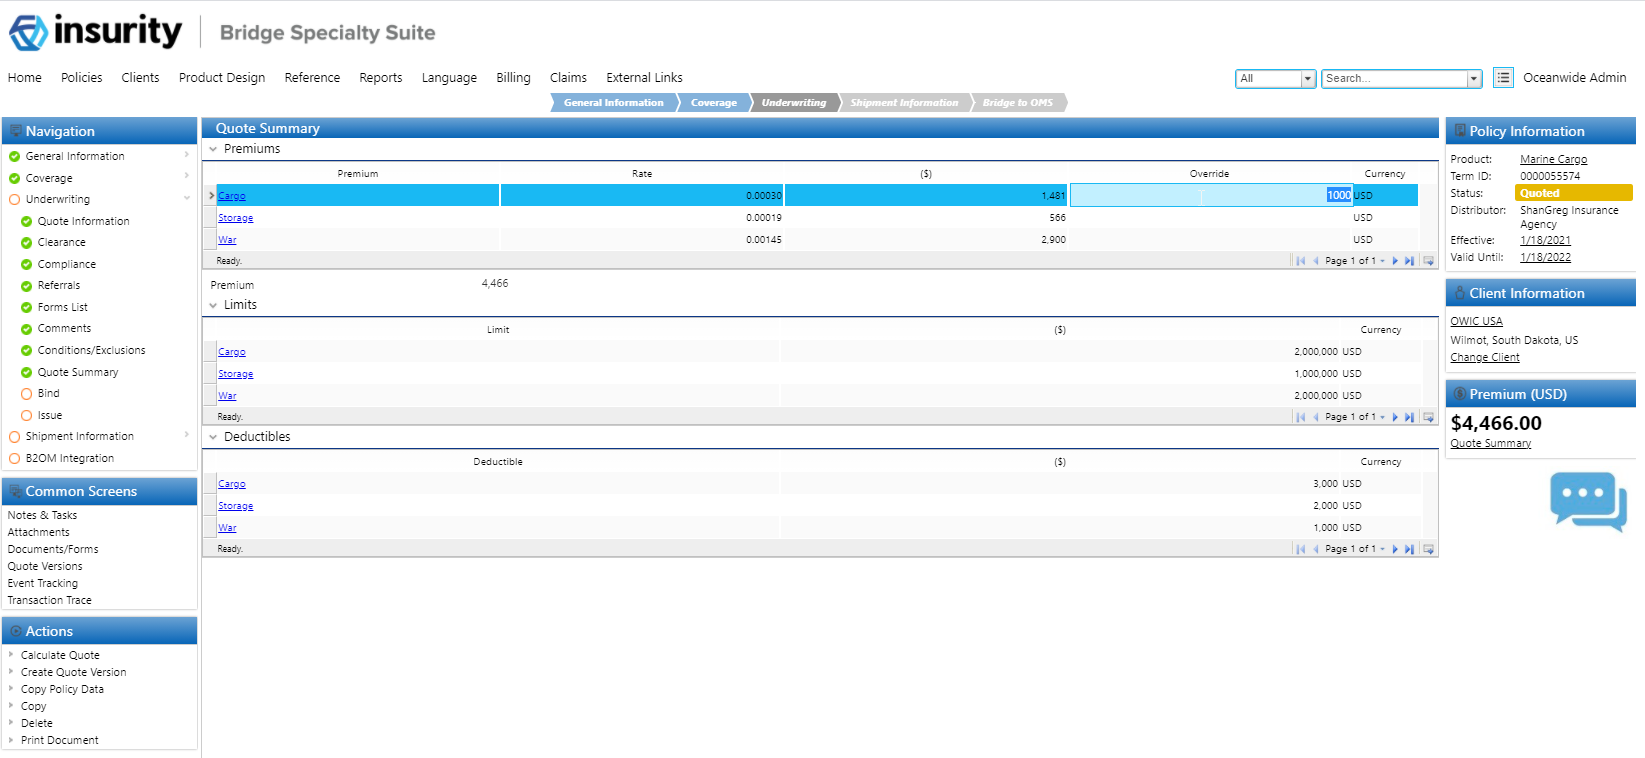
Use the Override column in the Premiums grid to override any of the premiums listed.
Bind
Use this screen to acknowledge a policy before binding, and select a payment plan.
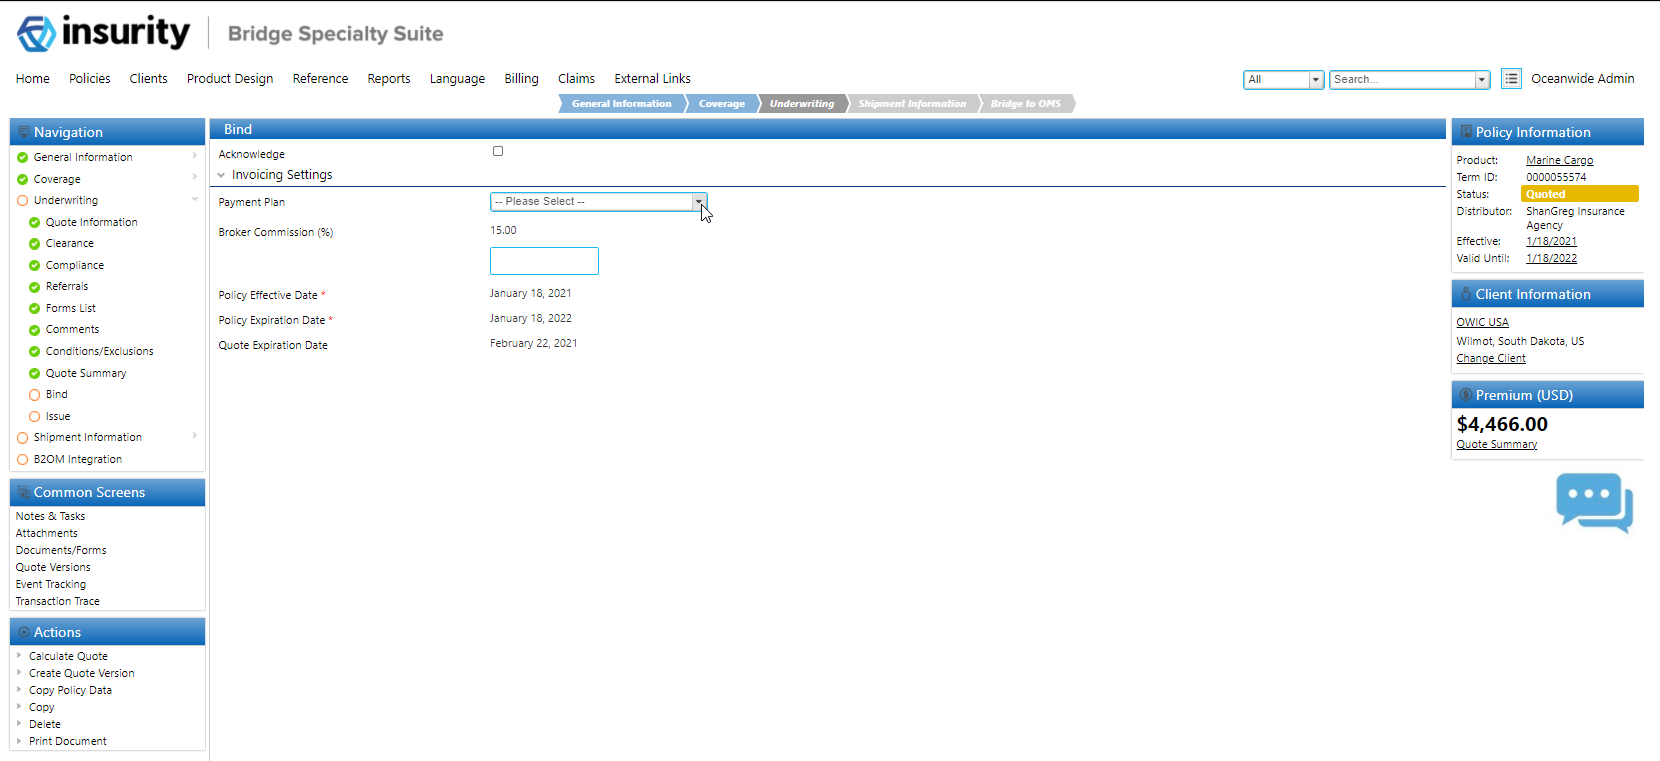
(Optional, can be tied to a bind validation) Check Acknowledge to acknowledge the policy before binding.
Select a payment plan for the policy.
The default broker commission can be overridden using the field under the Broker Commission field.
Issue

(Optional) Check the Issue Policy field to Issue the policy.
Note: Additional custom configuration will need to be added to add the custom policy status of Issued. Out of the box this checkbox does not do anything.
Policy Rates
This screen displays all policy rates that will be integrated to OMS to be used for logging shipments. Each row is a combination of the routes, conveyances, commodities, packing categories, and coverage options entered on the Cargo screen. Special Rates can be added for certain primary/named assureds in the Special Rates grid.
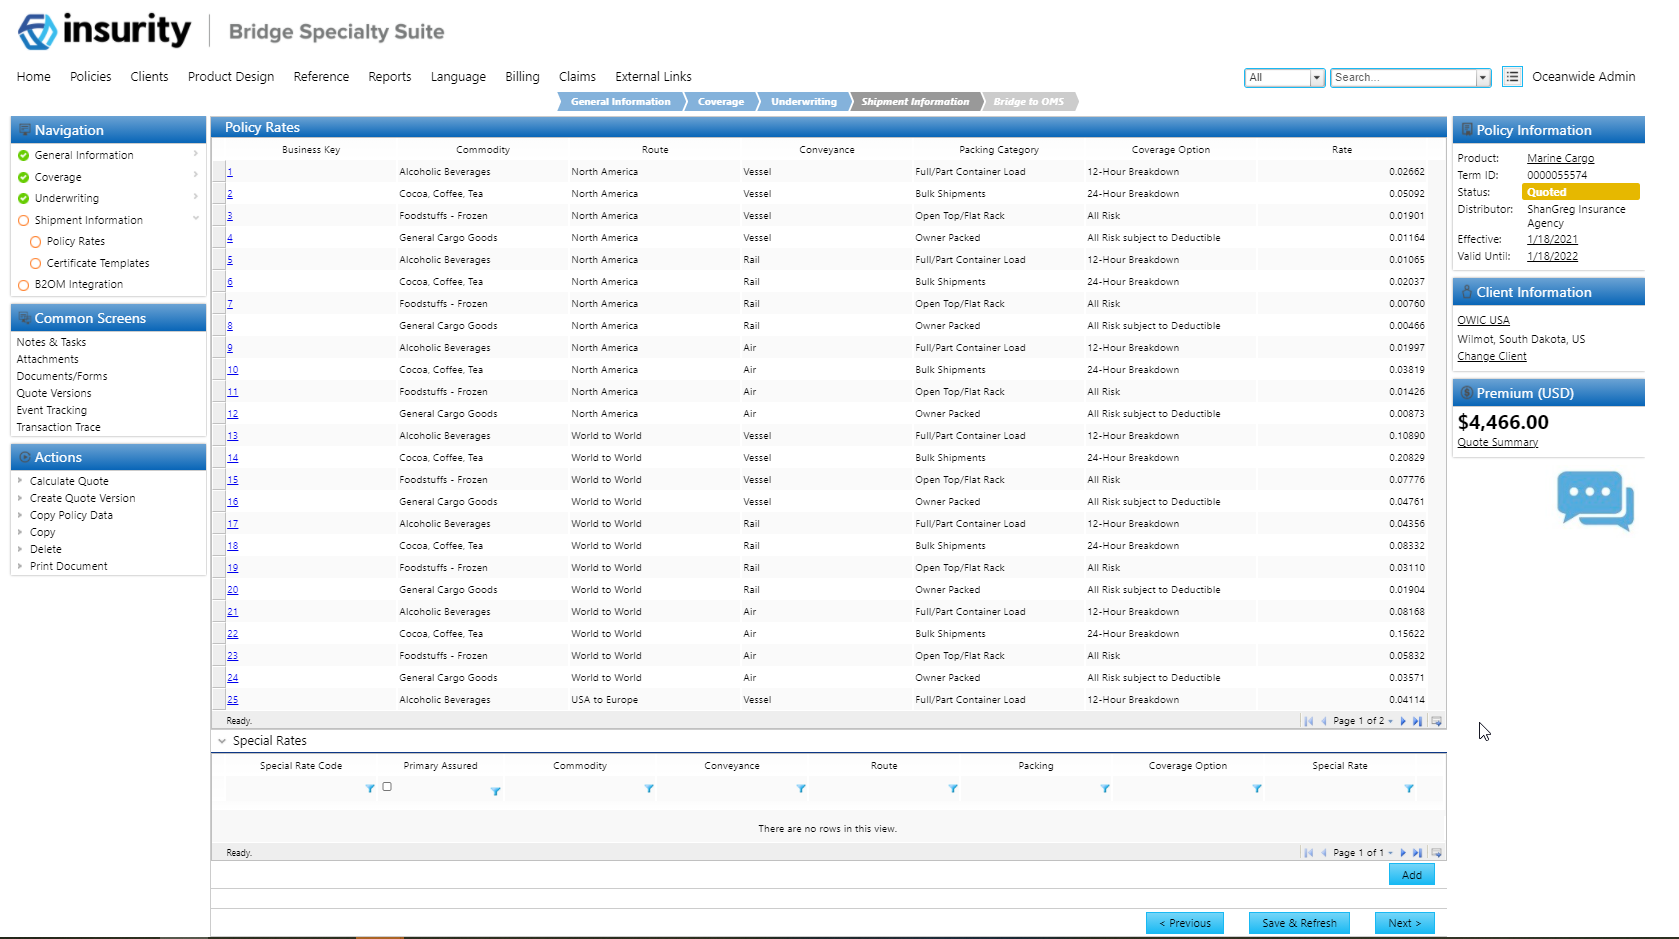
Click on the link in the first column to override any of the rates calculated.
Click Add on the Special Rates grid to add special rates for specific assureds.
Certificate Templates
Certificate Templates can be attached to a policy, along with the conveyances associated to each certificate template. Certificates will be printed only once the policy is integrated to OMS.

Click Add on the Certificate Templates grid to attach templates to the policy.
Implementing the Marine Cargo Template
This section details the process of implementing the Marine Cargo workflow, stepping through the process of elements that require manual input.
In order to import the Marine Cargo workflow into an existing environment, the Bridge Common Template containers needs to be imported first. Review the requirements section to ensure all the listed containers are present in the target environment before attempting to import the Marine Cargo Template.
Import the full Marine Cargo product/container to your environment. The following order needs to be considered:
- All the required Common Template containers have been imported in the environment.
- Import the Document Templates, and Security Roles files.
- Import the Marine Cargo product. This will ensure the Master Cover OceanMarine is included in the target environment.
If any of the above process triggers errors, do not proceed to the next step without resolving the error. Warnings indicating that resources have been placed in containers and can be ignored.
Note: Reach out to your Insurity representative for the resources required for importing the Marine Cargo product.
Publish the Marine Cargo workflow. Ensure no errors are thrown upon publishing.
Test the workflow to ensure default behaviors are present and functional.
Bridge Workflow Accelerators
All Bridge Common Template Solutions are included along with the Marine Cargo Template. To deactivate any of the templates, navigate to Product Design, Workflow Containers, Marine Cargo, Rules, Field Evaluation Rules, and remove the Field Evaluation Rules (FERs) for the following templates: are there any other templates that will be added to the list?
General (XBWFGeneralContainer)
Custom Client (CustomClient)
Additional Interests (ADINAdditionalInterests)
Clearance (CLRCClearanceContainer)
Compliance (CMPLComplianceContainer)
Eligibility (ELGBEligibilityContainer)
Insurance History (INHIInsuranceHistoryContainer)
Loss History (LOSSHistoryContainer)
Quote Versioning (QTVSQuoteVersioning)
Reinsurance (REINReinsuranceContainer)
Schedule of Forms (SOFScheduleofFormsContainer)
Subjectivities (SUBJSubjectivities)
Referrals (XLR8RReferral)
Importing and Customizing Data Tables
New data table instances should be uploaded to the below data tables where customization is desired. For each of the following Data Tables:
Navigate to Lookups, Data Tables under the Workflow Container Menu.
Search for the Data Table code provided for each of the following data tables.
Download the data table template from the link provided. Default rows will be provided in some of the templates, and each will have suggestions for customizations.
Data Tables for the base Workflow Accelerators contain the name of the common template in parentheses. If a base common template is not being included in the workflow, it is not necessary to upload the data tables for that base common template.
Additional Interest Types (Additional Interests)
Code: ADINPartyTypeDT
The package containing the Product XML can be obtained by contacting your Insurity representative.
Details: In the Additional Interests grid under the Additional Interests screen, this list governs the party type that can be associated to additional interests:

The additional interest type varies based on the selected Product Type. In order to change which field(s) to filter the types by, update the field OCMNPopulateADINFilterField with the desired field code(s).
Industry Types (Custom Client)
Code: CCLTIndustryTypesDT
The package containing the Product XML can be obtained by contacting your Insurity representative.
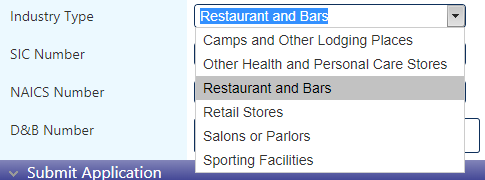
Details: In the Policy and Insured Details screen, this table drives the Industry Type associated with the insured company:
SIC Numbers (Custom Client)
Code: CCLTSICCodesDT
The package containing the Product XML can be obtained by contacting your Insurity representative.
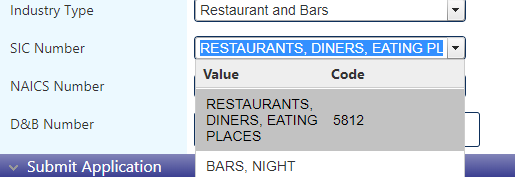
Details: In the Policy and Insured Details screen, this table drives the SIC Code associated with the insured company. The available selections are filtered by the previously selected Industry Type:
NAICS Numbers
Code: CCLTNAICSCodesDT
The package containing the Product XML can be obtained by contacting your Insurity representative.
Details: In the Policy and Insured Details screen, this table drives the Industry Type associated with the insured company. The available selections are filtered by the previously selected SIC Code:

Compliance Scan Lists (Compliance)
Code: CMPLScanListDT
The package containing the Product XML can be obtained by contacting your Insurity representative.
Details: In the Compliance screen under the Underwriting steps, this list determines the various lists against which compliance values will be evaluated. The list for which there has been a compliance hit is listed in the Detailed Results child grid:

Forms Conditions (Schedule of Forms)
Code: OCMNSOFConditionsDT
The package containing the Product XML can be obtained by contacting your Insurity representative.
Details: This list contains the conditions that are used to determine the applicability of each form in a policy.
Forms List (Schedule of Forms)
Code: OCMNSOFFormsDT
The package containing the Product XML can be obtained by contacting your Insurity representative.
Details: In the Forms List screen under the Underwriting steps, this list determines the various forms to be listed as part of the Schedule of Forms Common Template:

Eligibility Questions (Eligibility)
Code: OCMNELGBEligibilityQuestionsDT
The package containing the Product XML can be obtained by contacting your Insurity representative.
Details: In the Eligibility screen, the list of questions displayed varies based upon this list:

Currently, the list is filtered against the selected Industry Type of the insured, but the filtering can be set against another workflow field(s) by updating the following:
- Have the desired filter values present in the new data table instance for the data table OCMNELGBQuestionsDT.
Replace the current filter column with the desired filter value(s) in the data source configuration OCMNELGBEligibilityQuestionDS:

Update the field formula in the field OCMNELGBLookupDataSourceToGrid to execute a DetectChanges() on the new field(s) rather than on CCLTIndustryType.
Reinsurance Treaties (Reinsurance)
Code: OCMNREINTreatiesDT
Details: In the Reinsurance screen under the Underwriting step (only available on Quoted transactions), the data table governs the applicable treaties available for selection:

In order to change the parameters for which treaty to apply by default, the following needs to be done:
- Update the data table instance to have the desired default value(s) in the Default column of the data table OCMNREINTreatiesDT.
Replace the filter column in the data source configuration OCMNREINDefaultTreatyDS by any desired value(s) (whether static or dynamic):

Referral Conditions and Rules (Referrals)
Code: OCMNRfrlConditionsDT & OCMNRfrlRulesDT
The package containing the Product XML can be obtained by contacting your Insurity representative.
Details: In the Referrals screen under the Underwriting step, the joined two data tables manage the applicability of the referral rules against conditions/rules within the workflow:

Subjectivity Conditions and Subjectivities (Subjectivities)
Code: OCMNSubjConditionsDT & OCMNSubjSubjectivitiesDT
The package containing the Product XML can be obtained by contacting your Insurity representative.
Details: In the Subjectivities screen under the Underwriting step, the joined two data tables manage the applicability of the subjectivity rules against conditions/rules within the workflow:

Insurers (Insurance History)
Code: INHIInsurersDT
The package containing the Product XML can be obtained by contacting your Insurity representative.
Details: In the Insurance and Loss History screen under the General Information step, the insurers data table manages the list of available insurers for selection when providing prior coverage history:

Coinsurance Insurer/Insurer Role (General)
Code: XBWFInsurerDT & XBWFInsurerRoleDT
The package containing the Product XML can be obtained by contacting your Insurity representative.
Details: In the Quote Information screen under the Underwriting step, the list of insurers available for co-insurance (and the available co-insurance roles) is managed by these two data tables.

Endorsement Types (General)
Code: XBWFEndorsementTypesDT
The package containing the Product XML can be obtained by contacting your Insurity representative.
Details: In the Policy and Insured Details screen under the General Information step, the available endorsement types for selection when creating a new endorsement transaction are managed by this data table:

When updating the endorsement types, ensure to:
Create trigger(s) depending on new endorsement types. These triggers should be used to manage which screens are visible on endorsements. By default, the suggested behavior is to only display screens which have relevance to the selected endorsement type (Other displays the entire workflow). Refer to the following example trigger for additional endorsement types: OCMNEndorsementTypeIsNOTOtherANDNOTAdditionalInsured.
In the OCMNWorkflow workflow, edit the Screen Behavior Overrides for screens to be displayed/hidden depending on the endorsements being added. If a screen should be displayed for a new endorsement type or on Other endorsements, use the trigger created in step 1 in the Screen Behavior Override.
Adjustment Types (General)
Code: XBWFAdjustmentTypesDT
The package containing the Product XML can be obtained by contacting your Insurity representative.
Details: In the Policy and Insured Details screen under the General Information step, the available adjustment types for selection when creating a new adjustment transaction are managed by this data table:

Policy Types
Code: OCMNPolicyTypesDT
The package containing the Product XML can be obtained by contacting your Insurity representative.
Details: In the Policy and Insured Details screen, the Policy Type input is driven by this data table:

Note: Modifying this table will have a significant effect on the policy workflow as several fields, triggers and behaviors are depend on the values already existing within it.
Rate Period
Code: OCMNRatePeriodDT
The package containing the Product XML can be obtained by contacting your Insurity representative.
Details: This particular data table is used under storage settings to indicate the rate period under Storage Settings.

Payment Plans
Code: OCMNPaymentPlanDT
The package containing the Product XML can be obtained by contacting your Insurity representative.
Details: In the Bind screen, this data table drives the payment plans available for selection:

Coverages
Code: OCMNCoveragesDT
The package containing the Product XML can be obtained by contacting your Insurity representative.
Details: On the Coverages screen, the grid is populated with the values from this data table. Coverages can be set to be auto-selected, and a default limit and deductible can be entered.
Note: Modifying this table will have a significant effect on the policy workflow as several fields, triggers and behaviors are depend on the values already existing within it.

Deductible Type
Code: OCMNCoverageDeductibleType
The package containing the Product XML can be obtained by contacting your Insurity representative.
Details: Under the Deductibles child grid of the Coverages grid, the available deductible types are managed by this data table.

Limit Type
Code: OCMNCoverageLimitTypesDT
The package containing the Product XML can be obtained by contacting your Insurity representative.
Details: Under the Limits child grid of the Coverages grid, the available limit types are managed by this data table.

Commodities
Code: OCMNCommodityDT
The package containing the Product XML can be obtained by contacting your Insurity representative.
Details: In the Commodities grid on the Cargo Details screen, the Commodity dropdown is managed by this data table. The commodity name, commodity group, and rate per commodity are managed here.

Conveyances
Code: OCMNConveyanceDT
The package containing the Product XML can be obtained by contacting your Insurity representative.
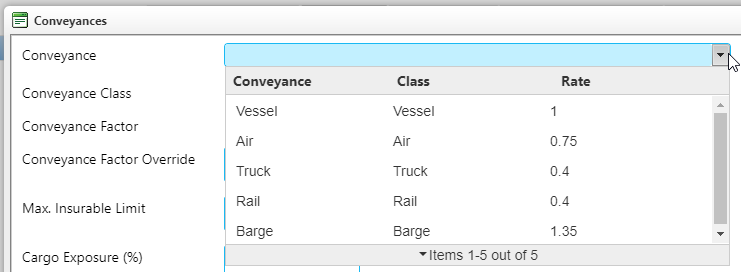
Detail: In the Conveyances grid on the Cargo Details screen, the Conveyance drop-down is managed by this data table. The conveyance name, class, and factor per conveyance are managed here.
Routes
Code: OCMNRouteDT
The package containing the Product XML can be obtained by contacting your Insurity representative.
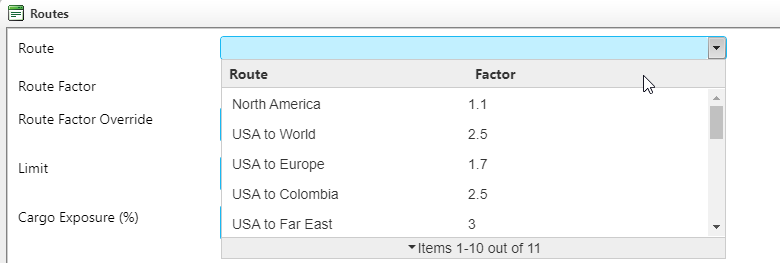
Details: In the Routes grid on the Cargo Details screen, the Routes drop-down is managed by this data table. The route name, and factor per route are managed here.
Coverage Options
Code: OCMNCoverageOptionDT
The package containing the Product XML can be obtained by contacting your Insurity representative.
Details: On the Cargo Details screen, the Coverage Option dropdown is in the Commodities grid, and is managed by this data table.

Packing Categories
Code: OCMNPackingDT
The package containing the Product XML can be obtained by contacting your Insurity representative.
Details: On the Cargo Details screen, the Packing Category dropdown is in the Commodities grid, and is managed by this data table.

CAT Perils
Code: OCMNCatPerilDT
The package containing the Product XML can be obtained by contacting your Insurity representative.
Details: In the Named Locations grid on the Storage Details screen, the CAT Perils grid is on the second tab. This data table is outputted to the grid, and CAT perils can be selected by default, and a default sublimit and deductible can be added in the data table.

Construction Type
Code: OCMNConstructionTypeDT
The package containing the Product XML can be obtained by contacting your Insurity representative.
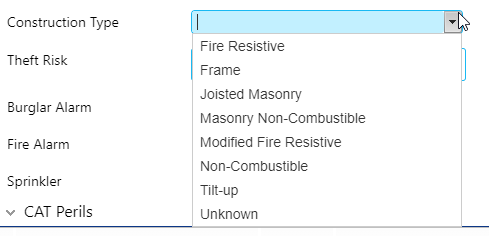
Details: In the Named Locations grid on the Storage Details screen, the Construction Type drop down is managed by this data table.
Country Lookup
Code: CountryLocationLookupDT
The package containing the Product XML can be obtained by contacting your Insurity representative.
Details: This is a lookup data table that contains a location factor for each country.
Exclusions
Code: OCMNExclusionDT
The package containing the Product XML can be obtained by contacting your Insurity representative.
Details: On the Conditions/Exclusions screen, this data table is outputted to the Exclusions grid. Each exclusion can be set as default selected. There is an option to filter Exclusions by the coverages that are selected.

Insuring Conditions
Code: OCMNInsuringConditionsDT
The package containing the Product XML can be obtained by contacting your Insurity representative.
Details: Insuring conditions are used across several grids in the workflow, and this data table manages all Insuring Conditions. The insuring conditions lookup dropdown contains the name of the insuring condition, and the insuring conditions text area is where the text is outputted.

Certificate Templates
Code: OCMNCertificateTemplateDT
The package containing the Product XML can be obtained by contacting your Insurity representative.
Details: In the grid on the Certificate Templates screen, this data table manages the Certificate Template dropdown.

Conditions
Code: OCMNConditionDT
The package containing the Product XML can be obtained by contacting your Insurity representative.
Detail: On the Conditions/Exclusions screen, this data table is outputted to the Conditions grid. Each condition be set as default selected. There is an option to filter conditions by the coverages that are selected.

Valuation
Code: OCMNValuationDT
The package containing the Product XML can be obtained by contacting your Insurity representative.
Details: This data table manages the Basis of Valuation drop down that is on the Cargo Details and Storage details screen.

Add all Routes applicable to the policy. This can be done by attaching them manually to the grid or uploading a spreadsheet.